


When designing CLI applications we always face challenges as python programmers when it comes to making the text/UI look good. But have you ever wondered if this tedious task could be abstracted behind a powerful terminal UI library, which is simple to use yet extremely powerful? Well, you're in luck as this blog will tell you all you need to know about such a library: Rich.
Rich is a Python library for rich text and gorgeous formatting in the console. Rich makes it easy to add color and style to the CLI of your program. It supports rendering tables, syntax highlighted source code, progress bars, markdown, tracebacks and many more out of the box!
Compatibility
Rich is cross-platform and also works with the True Color / Emojis from the new
Windows Terminal. The classic terminal in Windows is limited to 16 colours.
Rich requires Python 3.6.1 or higher. It also works with Jupyter
notebooks without any additional configuration.
Installation
Rich can be installed through from PyPI very easily using pip (or any other package manager).
python -m pip install rich
Then you can test Rich using the following command:
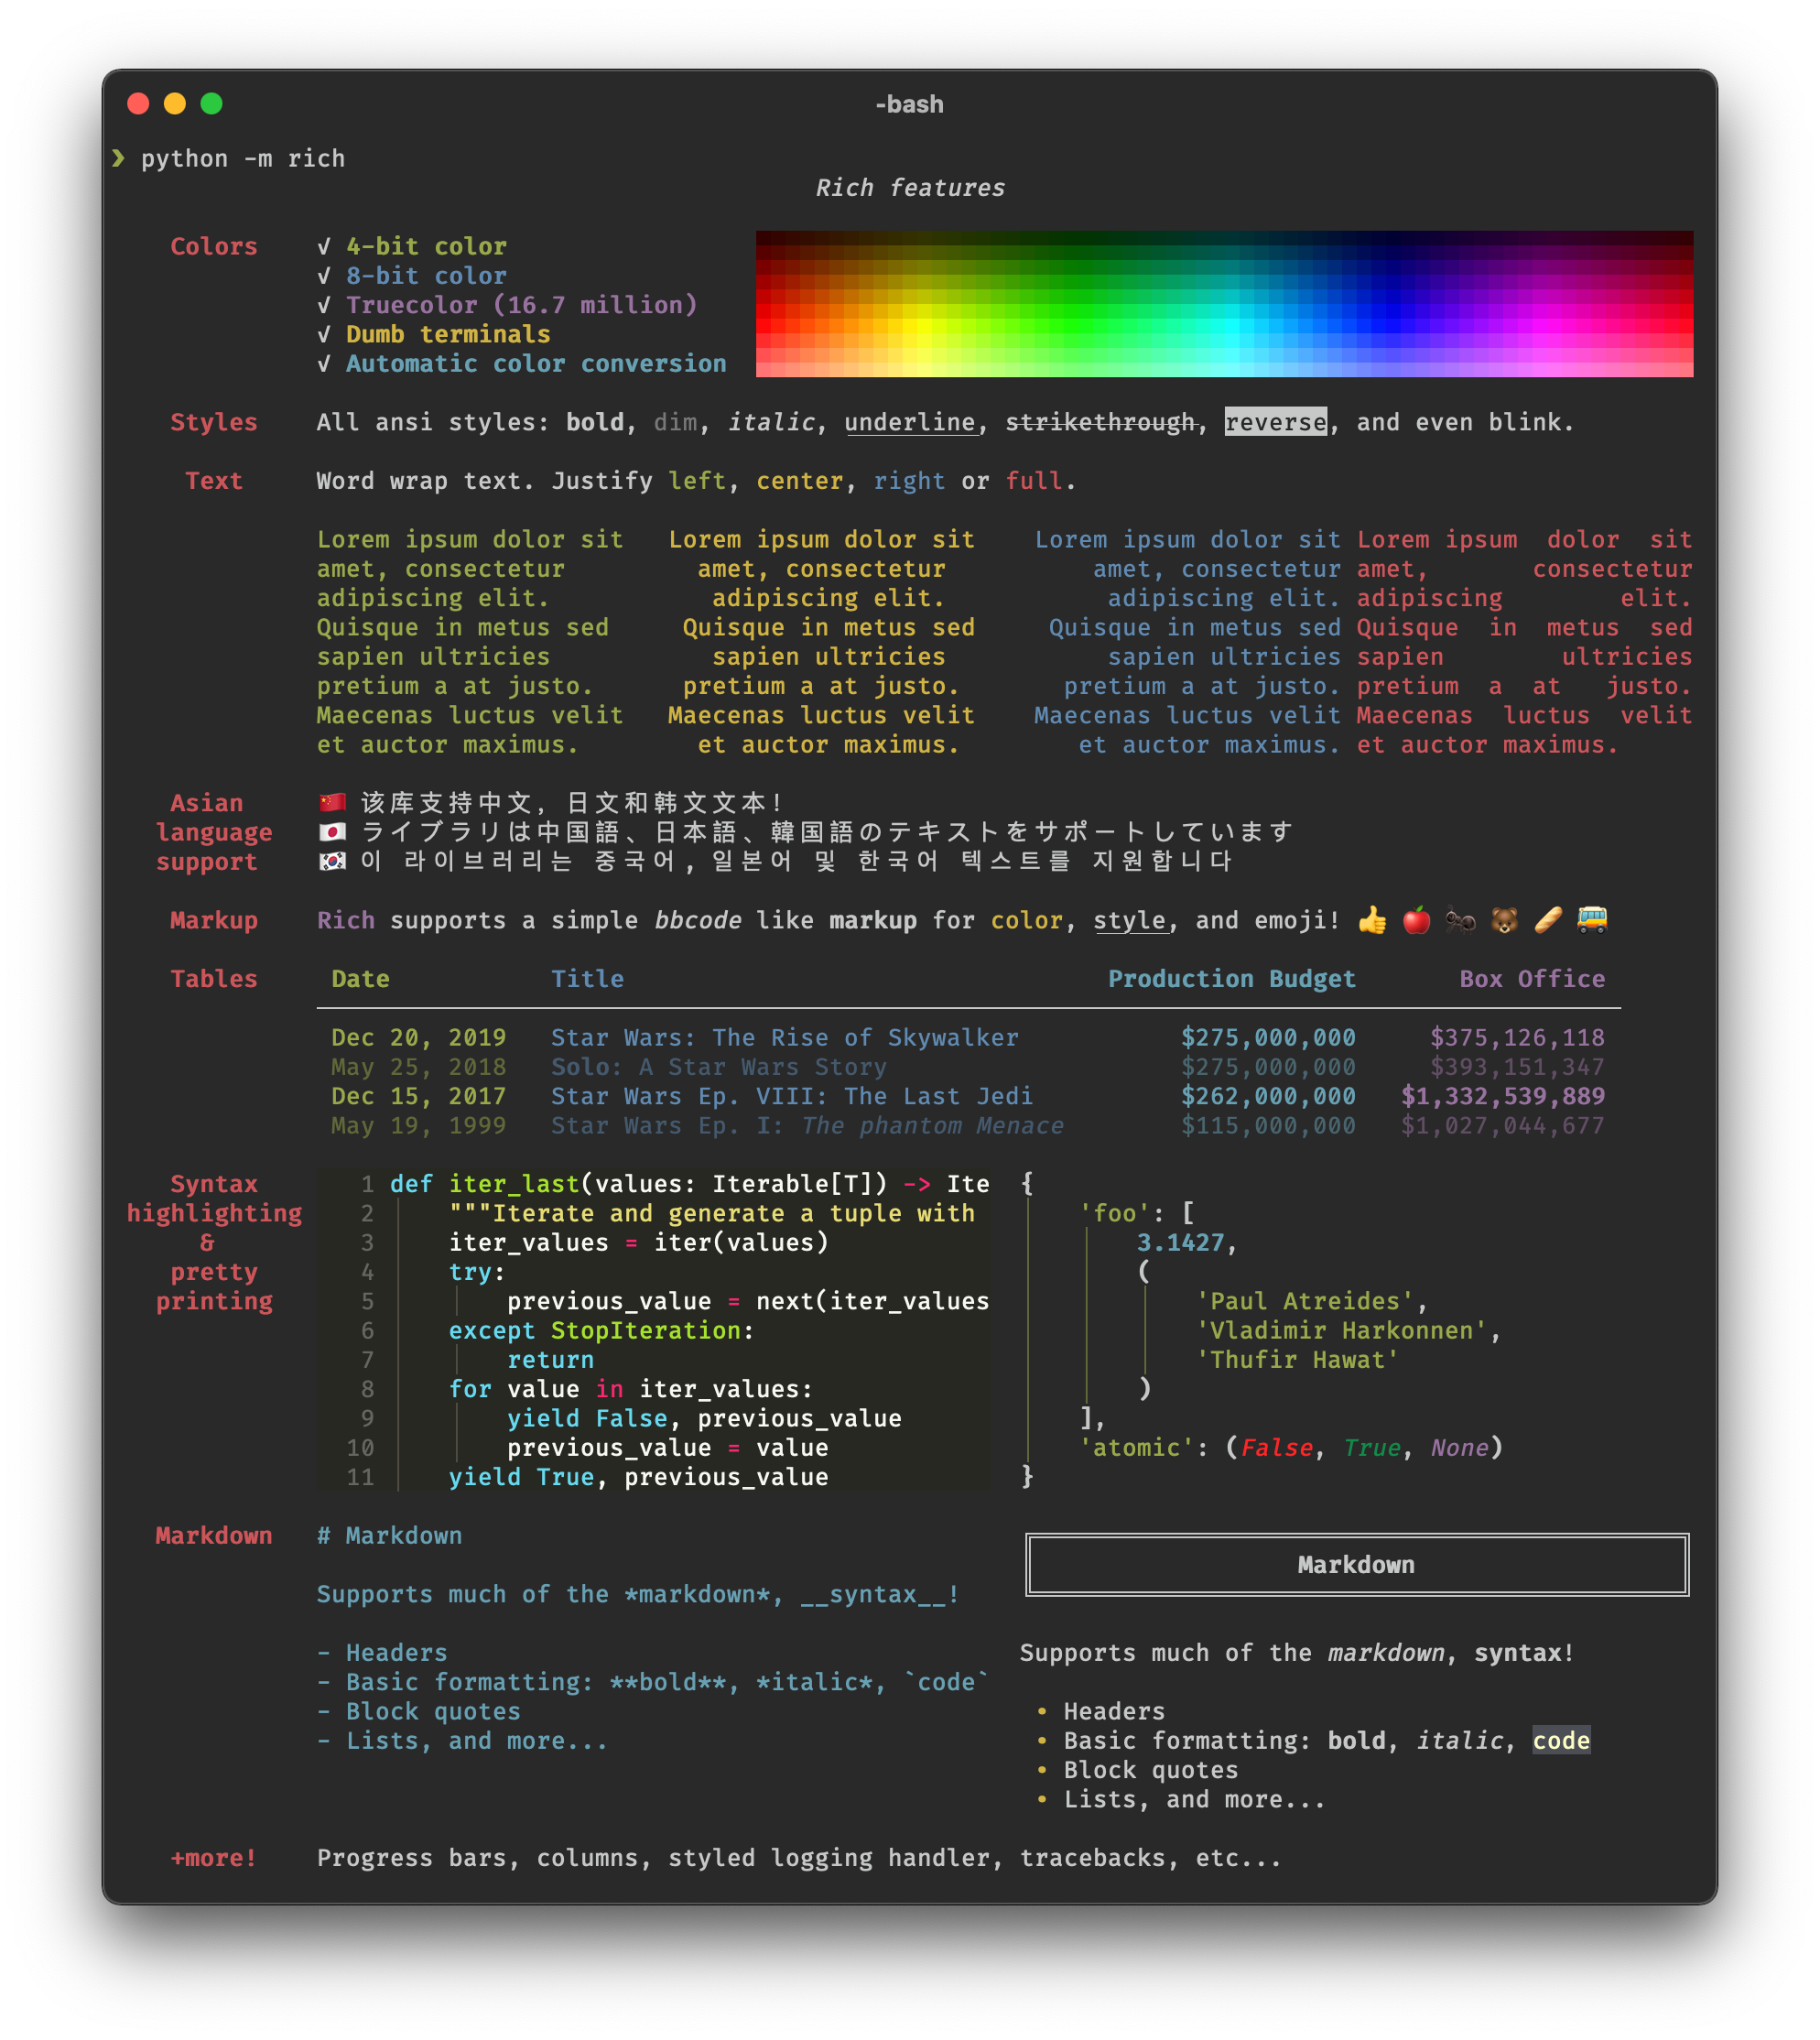
python -m rich
Getting started
Rich has a plethora of features under its belt. Let's have a quick look at each of them.
Rich Print
Rich provides a
print()
function to facilitate printing rich output to the console. Moreover, this
function has an identical signature to the built-in print(). Let's try it!
from rich import print

# Colored text
print("[yellow]Yellow text[/yellow]")

# Stylized text
print("[bold]Bold text[/bold]")

# Emojis
print("Text with :lemon:")

# All three combined
print("[bold yellow]Bold yellow text with :lemon:[/bold yellow]")

# Pretty formatting of objects
print(locals())
Output:

Rich supports Console Markup (inspired by bbcode) to insert colour and stylize the output. You can then print strings or objects to the terminal in the usual way. Rich will do some basic syntax highlighting and format data structures to make them easier to read.
If you don't want to replace the built-in print() in your program with Rich's
you can use an import alias.
from rich import print as rprint
Console Markup
Rich supports a simple markup which you can use to insert colour and styles
virtually everywhere Rich would accept a string (e.g. print() and log()).
Run the following command to see some examples:
python -m rich.markup
Syntax
Rich's console markup is inspired by
bbcode. You can start the
style by writing it
in []. The style will be applied till the closing [/]. Let's see an
example:
from rich import print

print("[bold red]alert![/bold red] Something happened")
Output:

Text
Rich has a Text class you
can use to mark up strings with color and style attributes. You can use a
Text instance anywhere a string is accepted, which gives you a lot of
control over presentation.
One way to add a style to Text is the stylize() method which applies a style
to a start and end offset. Here's an example:
from rich.console import Console
from rich.text import Text

console = Console()
text = Text("Hello, World!")
text.stylize("bold magenta", 0, 6)
console.print(text)
This will print “Hello, World!” to the terminal, with the first word in bold magenta.
Alternatively, you can construct styled text by calling append() to add a
string and style to the end of the Text. Here’s an example:
text = Text()
text.append("Hello", style="bold magenta")
text.append(" World!")
console.print(text)
Text attributes
You can set several parameters on the Text class's constructor to control how
the text is displayed.
justifyshould be “left”, “centre”, “right”, or “full”, and will override default justify behaviour.overflowshould be “fold”, “crop”, or “ellipsis”, and will override the default overflow.no_wrapprevents wrapping if the text is longer than the available width.tab_sizeSets the number of characters in a tab.
A Text instance may be used in place of a plain string virtually everywhere
in the Rich API, which gives you a lot of control over how text renders within
other Rich renderables. For instance, the following example right aligns text
within a Panel:
from rich import print
from rich.panel import Panel
from rich.text import Text

panel = Panel(Text("Hello", justify="right"))
print(panel)
Output:

Highlighting
Rich can apply styles to text patterns that you print() or log(). Rich will
highlight numbers, strings, collections, booleans, None, and a few
more exotic patterns like file paths, URLs, and UUIDs with the default
settings.
Setting highlight=False on print() or log() disables highlighting, as
does setting highlight=False on the
Console constructor,
which disables it everywhere. If you disable highlighting in the constructor,
you may still use highlight=True on print/log to selectively enable it.
Custom Highlighters
You can create a custom highlighter if the default highlighting does not meet
your needs. Extending the RegexHighlighter class, which applies a style to
any text matching a list of regular expressions, is the simplest method to do
this.
Here is an example of text that appears to be an email address:
from rich.console import Console
from rich.highlighter import RegexHighlighter
from rich.theme import Theme


class EmailHighlighter(RegexHighlighter):
    """Apply style to anything that looks like an email."""

    base_style = "example."
    highlights = [r"(?P<email>[\w-]+@([\w-]+\.)+[\w-]+)"]


theme = Theme({"example.email": "bold magenta"})
console = Console(highlighter=EmailHighlighter(), theme=theme)
console.print("Send funds to money@example.org")
Output:

While RegexHighlighter is a powerful tool, you can modify its base class
Highlighter to create your highlighting scheme. It just has one method,
highlight, to which the Text to highlight is supplied.
Here's an example that uses a different colour for each character:
from random import randint

from rich import print
from rich.highlighter import Highlighter


class RainbowHighlighter(Highlighter):
    def highlight(self, text):
        for index in range(len(text)):
            text.stylize(f"color({randint(16, 255)})", index, index + 1)


rainbow = RainbowHighlighter()
print(rainbow("I must not fear. Fear is the mind-killer."))
Output:

Pretty Printing
Rich will format (i.e. pretty print) containers like lists, dicts, and sets in addition to syntax highlighting.
To view an example of nice printed output, use the following command:
python -m rich.pretty
Take note of how the output will adjust to fit the terminal width.
pprint method
You can use the pprint() method to adjust how items are nicely printed with a
few more options. Here's how you'd go about doing it:
from rich.pretty import pprint

pprint(locals())
Output:

Pretty renderable
You can use Rich's Pretty class to inject pretty printed data into another renderable.
The following example shows how to display attractive printed data in a basic panel:
from rich import print
from rich.pretty import Pretty
from rich.panel import Panel

pretty = Pretty(locals())
panel = Panel(pretty)
print(panel)

You can checkout the Rich Repr Protocol to customize Rich's formatting capabilities.
Logging Handler
Rich includes a logging handler that formats and colors text generated by the Python logging package.
An example of how to set up a rich logger is as follows:
import logging
from rich.logging import RichHandler

FORMAT = "%(message)s"
logging.basicConfig(
    level="NOTSET", format=FORMAT, datefmt="[%X]", handlers=[RichHandler()]
)

log = logging.getLogger("rich")
log.info("Hello, World!")
Output:

Because most libraries are unaware of the need to escape literal square
brackets, rich logs will not render Console
Markup in
logging by default, but you can enable it by setting markup=True on the
handler. Alternatively, you can enable it per log message by adding the
following extra argument:
log.error("[bold red blink]Server is shutting down![/]", extra={"markup": True})
Similarly, the highlighter can be turned off or on for each log message:
log.error("123 will not be highlighted", extra={"highlighter": None})
Handle exceptions
RichHandler can be configured to format exceptions using Rich's Traceback
class, which provides more context than a built-in exception. Set rich
tracebacks=True on the handler constructor to obtain attractive exceptions in
your logs:
import logging
from rich.logging import RichHandler

logging.basicConfig(
    level="NOTSET",
    format="%(message)s",
    datefmt="[%X]",
    handlers=[RichHandler(rich_tracebacks=True)],
)

log = logging.getLogger("rich")
try:
    print(1 / 0)
except Exception:
    log.exception("unable print!")
Output:

There are a few more options for configuring logging output; check the
RichHandler reference for more information.
Traceback
Rich can format and highlight Python tracebacks with syntax highlighting. Rich tracebacks are easier to read than ordinary Python tracebacks and show more code.
python -m rich.traceback
Printing tracebacks
The print_exception() method prints a traceback for the currently handled
exception. Here's an illustration:
from rich.console import Console

console = Console()

try:
    do_something()
except Exception:
    console.print_exception(show_locals=True)
Output:

Rich displays the value of local variables for each frame of the traceback when
the show_locals argument is set to True.
For a more detailed example, see
exception.py.
Traceback Handler
Rich can be set as the default traceback handler, which means that all uncaught exceptions will be highlighted.
from rich.traceback import install

install(show_locals=True)
For more details on this, see Traceback Handler.
Prompt
Rich offers several Prompt classes that ask for input from the user and loop
until it receives a valid response (they all use the Console
API internally).
Here's a simple illustration:
from rich.prompt import Prompt

name = Prompt.ask("Enter your name")
The prompt can be specified as a string (which can include Console
Markup and
emoji code) or as a Text object.
You can specify a default value to be returned if the user presses return without typing anything:
from rich.prompt import Prompt

name = Prompt.ask("Enter your name", default="Paul Atreides")
If you provide a list of options, the prompt will loop until the user selects one:
from rich.prompt import Prompt

name = Prompt.ask(
    "Enter your name", choices=["Paul", "Jessica", "Duncan"], default="Paul"
)
You can use IntPrompt, which asks for an integer, and FloatPrompt, which
asks for floats, in addition to Prompt, which delivers strings.
The Confirm class is a specific prompt for asking a basic yes/no question to
the user. Here's an example:
from rich.prompt import Confirm

is_rich_great = Confirm.ask("Do you like rich?")
assert is_rich_great
The Prompt class can be customized via inheritance. Examples can be found in
prompt.py.
Run the following command from the command line to see some of the prompts in action:
python -m rich.prompt
Columns
The Columns class allows Rich to render text or other Rich renderable in
clean columns. To use, create a Columns instance and print it to the Console
with an iterable of renderable.
The following is a very rudimentary clone of the ls command in OSX/Linux for
listing directory contents:
import os
import sys

from rich import print
from rich.columns import Columns

if len(sys.argv) < 2:
    print("Usage: python columns.py DIRECTORY")
else:
    directory = os.listdir(sys.argv[1])
    columns = Columns(directory, equal=True, expand=True)
    print(columns)
Output:

See
columns.py
for an example of a script that generates columns with more than just text.
Render Groups
The Group class enables you to group many renderables so that they can be
rendered in a context where only one renderable is allowed. For example, you
might want to use a Panel to display multiple renderable.
To render two panels within a third, create a Group and pass the child renderables as positional parameters, then wrap the result in another Panel:
from rich import print
from rich.console import Group
from rich.panel import Panel

panel_group = Group(
    Panel("Hello", style="on blue"),
    Panel("World", style="on red"),
)
print(Panel(panel_group))
Output:

This method is useful when you know ahead of time which renderables will be in
a group, but it can become inconvenient if you have a higher number of
renderable, particularly if they are dynamic. To cope with these circumstances,
Rich provides the group() decorator. An iterator of renderables is used by
the decorator to create a group.
The following is the decorator equivalent of the preceding example:
from rich import print
from rich.console import group
from rich.panel import Panel


@group()
def get_panels():
    yield Panel("Hello", style="on blue")
    yield Panel("World", style="on red")


print(Panel(get_panels()))
Markdown
Rich can render Markdown to the console. Construct a Markdown object and then
print it to the console to render markdown. Markdown is a fantastic method to
add rich content to your command line programmes.
Here's an example of how to put it to use:
from rich.console import Console
from rich.markdown import Markdown

MARKDOWN = """
# This is an h1

Rich can do a pretty *decent* job of rendering markdown.

1. This is a list item
2. This is another list item
"""

console = Console()
md = Markdown(MARKDOWN)
console.print(md)
Output:

It's worth noting that code blocks include full syntax highlighting!
The Markdown class can also be used from the command line. In the terminal, the following example displays a readme:
python -m rich.markdown README.md
To display the whole set of arguments for the markdown command, type:
python -m rich.markdown -h
Padding
To put white space around text or other renderable, use the Padding class.
The following example will print the word "Hello" with 1 character of padding
above and below it, as well as a space on the left and right edges:
from rich import print
from rich.padding import Padding

test = Padding("Hello", 1)
print(test)
Instead of a single value, you can describe the padding on a more detailed level by using a tuple of values. The top/bottom and left/right padding are set by a tuple of two values, whereas the padding for the top, right, bottom, and left sides is set by a tuple of four values. If you're familiar with CSS, you'll know this scheme.
The following, for example, has two blank lines above and below the text, as well as four spaces of padding on the left and right sides:
from rich import print
from rich.padding import Padding

test = Padding("Hello", 1)
print(test)
The Padding class also has a style argument that applies a style to the
padding and contents, as well as an expand switch that can be set to False
to prevent the padding from stretching to the terminal's full width.
Here's an example that exemplifies both of these points:
from rich import print
from rich.padding import Padding

test = Padding("Hello", (2, 4), style="on blue", expand=False)
print(test)
Padding can be used in any context, just like all Rich renderable. For example,
in a Table, you could add a Padding object to a row with padding of 1 and a
style of "on the red" to emphasise an item.
Padding
Construct a Panel using the renderable as the first positional argument to build a border around text or another renderable. Here's an illustration:
from rich import print
from rich.panel import Panel

print(Panel("Hello, [red]World!"))
Output:

By passing the box argument to the Panel constructor, you can change the
panel's style. A list of possible box styles may be found at
Box.
The panels will span the whole width of the terminal. By specifying
expand=False on the constructor, or by building the Panel with fit(), you
may make the panel fit the content. Consider the following scenario:
from rich import print
from rich.panel import Panel

print(Panel.fit("Hello, [red]World!"))
Output:

The Panel constructor takes two arguments: a title argument that draws a
title at the top of the panel, and a subtitle argument that draws a subtitle
at the bottom:
from rich import print
from rich.panel import Panel

print(Panel("Hello, [red]World!", title="Welcome", subtitle="Thank you"))
Output:

See Panel for details on how to customize Panels.
Progress Display
Rich can show continuously updated information about the status of long-running tasks, file copies, and so forth. The information presented can be customised; by default, a description of the 'task,' a progress bar, percentage complete, and anticipated time left will be provided.
Multiple tasks are supported with a rich progress display, each with a bar and progress statistics. This can be used to keep track of several jobs that are being worked on in threads or processes.
Try this from the command line to see how the progress display looks:
python -m rich.progress
Progress is compatible with Jupyter notebooks, however, auto-refresh is
disabled. When calling update, you must explicitly call refresh() or set
refresh=True when calling update(). Alternatively, you can use the
track() function, which performs an automatic refresh after each loop.
Basic usage
For basic functionality, use the track() function, which takes a sequence
(such as a list or range object) and an optional job description. On each
iteration, the track method will return values from the sequence and update the
progress information.
Here's an illustration:
from rich.progress import track
from time import sleep

for n in track(range(10), description="Processing..."):
    sleep(n)
Output:

For advanced usage, read the docs.
Syntax
Rich can syntax highlight various programming languages with line numbers.
Construct a Syntax object and print it to the console to highlight code. Here's an illustration:
from rich.console import Console
from rich.syntax import Syntax

console = Console()
with open("syntax.py", "rt") as code_file:
    syntax = Syntax(code_file.read(), "python")
console.print(syntax)
Output:

You may also use the from_path() alternative constructor which will load the code from disk and auto-detect the file type.
The example above could be re-written as follows:
from rich.console import Console
from rich.syntax import Syntax

console = Console()
syntax = Syntax.from_path("syntax.py")
console.print(syntax)
For more details, and features: read the docs
Tables
Rich's Table class provides several options for displaying tabular data on
the terminal.
To draw a table, create a Table object, use add_column() and add_row() to
add columns and rows, and then print it to the terminal.
Here's an illustration:
from rich.console import Console
from rich.table import Table

table = Table(title="Star Wars Movies")

table.add_column("Released", justify="right", style="cyan", no_wrap=True)
table.add_column("Title", style="magenta")
table.add_column("Box Office", justify="right", style="green")

table.add_row("Dec 20, 2019", "Star Wars: The Rise of Skywalker", "$952,110,690")
table.add_row("May 25, 2018", "Solo: A Star Wars Story", "$393,151,347")
table.add_row("Dec 15, 2017", "Star Wars Ep. V111: The Last Jedi", "$1,332,539,889")
table.add_row("Dec 16, 2016", "Rogue One: A Star Wars Story", "$1,332,439,889")

console = Console()
console.print(table)
Output:

Rich will compute the best column sizes for your material, and text will be wrapped to fit if the terminal isn't big enough.
The add row method allows you to do more than just add text. You are free to include everything Rich is capable of rendering (including another table).
For more details, read the docs
Tree
Rich offers a Tree class that can build a terminal tree view. A tree view is
an excellent technique to display the contents of a file system or other
hierarchical data. A label for each branch of the tree can be text or any other
Rich renderable.
To see an example of a Rich tree, run the following command:
python -m rich.tree
The following code creates and prints a tree with a simple text label:
from rich.tree import Tree
from rich import print

tree = Tree("Rich Tree")
print(tree)
This will only output the word "Rich Tree" if there is just one Tree
instance. When we call add() to add new branches to the Tree, things get much
more fascinating. The code that follows adds two more branches:
tree.add("foo")
tree.add("bar")
print(tree)
Two branches will now be attached to the original tree via guide lines.
A new Tree instance is returned when you call add(). You can use this
instance to create a more complex tree by adding more branches. Let's expand
the tree with a couple more levels:
baz_tree = tree.add("baz")
baz_tree.add("[red]Red").add("[green]Green").add("[blue]Blue")
print(tree)
Tree styles
You can supply a style parameter for the entire branch, as well as a
guide_style argument for the guidelines, in the Tree constructor and add()
method. These styles are passed down through the branches and will apply to any
sub-trees.
Rich will select the thicker forms of Unicode line characters if you set guide
style to bold. Similarly, if you choose the "underline2" style, you'll get
Unicode characters with two lines.
Examples
See
tree.py,
which can produce a tree view of a directory on your hard drive, for a more
practical demonstration.
Live Display
To animate portions of the terminal, progress bars and status indicators employ
a live display. The Live class allows you to create bespoke live displays.
Run the following command to see a live display demonstration:
python -m rich.live
Note: If you see ellipsis "...", it means your terminal isn't tall enough to display the entire table.
Basic usage
Construct a Live object with a renderable and use it as a context manager to
make a live display. The live display will be visible throughout the context.
To update the display, you can update the renderable:
import time

from rich.live import Live
from rich.table import Table

table = Table()
table.add_column("Row ID")
table.add_column("Description")
table.add_column("Level")

with Live(table, refresh_per_second=4):  # update 4 times a second to feel fluid
    for row in range(12):
        time.sleep(0.4)  # arbitrary delay
        # update the renderable internally
        table.add_row(f"{row}", f"description {row}", "[red]ERROR")
For more details, read the docs
Rich supports more features like Layouts, and interacting with the console protocol
Conclusion
Thank you for reading! Follow us on Twitter for more tech blogs. To learn more about Rich you can take a look at their wonderful documentation, on which this blog was based upon.
Until next time, Sourajyoti